8 Pro-Tips: Advanced Personalization, Aliases, Exporting Data, and Editing Active Campaigns
Contents
In this article, I’m going to show how to use some of the more advanced features of the tool so that you can make sure you’re using Mailshake to its full potential.
Here is what we’re going to cover:
- Advanced personalization and text replacements
- The sending calendar: editing when emails are sent
- Sending from your business email (ie. @compyname.com), even if you don’t use Gmail
- Exporting campaign performance data
- Editing settings within active campaigns
Advanced personalization and text replacements (custom fields)
Sending personalized emails is essential to effective cold email outreach. Here are a few ways Mailshake allows you to send highly customized emails without needing to edit each individual email.
We have a section of our help center dedicated to personalization, but here are some of the more advanced personalization options to take your outreach to the next level.
Default text replacements
First, there are many times where you don’t have text replacements for every recipient. For example, you may have an email address, but not a name, for a handful of recipients on a list.
In this case, you can set up a ‘default text replacement’ that will clear up any empty text replacements that are tripping up your campaign.
In the example below, I replace my name text replacement (‘{{first}}’) with ‘there’, so anyone who’s name I don’t have will see ‘Hey there’, but you can use default text replacements for any part of your email.
To do this, simply set your text replacement as {{first:there}}. Easy as that.
URL Text Replacements
Sometimes, you need to send different recipients different URLs. There are a few reasons you might want to do this. I’ve had to do this for content promotion; I’m reaching out to people to let them know I’ve linked to an article of theirs, and I want to include a link to their article.
You also may want to send unique custom tracking URLs to each recipient, or links to pages or reports customized to that recipient.
Setting this up in Mailshake is very simple. It just requires adding a text replacement within the URL box in your campaign template.
Step 1: Prepare your CSV file
Make sure your CSV file has a “url” column, or something similar. Each recipient should have their own url that goes here. To get around a little trick we’ll talk about in a second, make sure these urls don’t start with “http://” — they should have everything after it (ergo “google.com” instead of “http://google.com”).
Step 2: Composing your message
Type out your email and highlight the words where you want the link to appear. Click on the link toolbar icon and enter: “http://{{url}}” — keeping in mind that if your CSV file used a different column header you’ll need to change “url” to match.
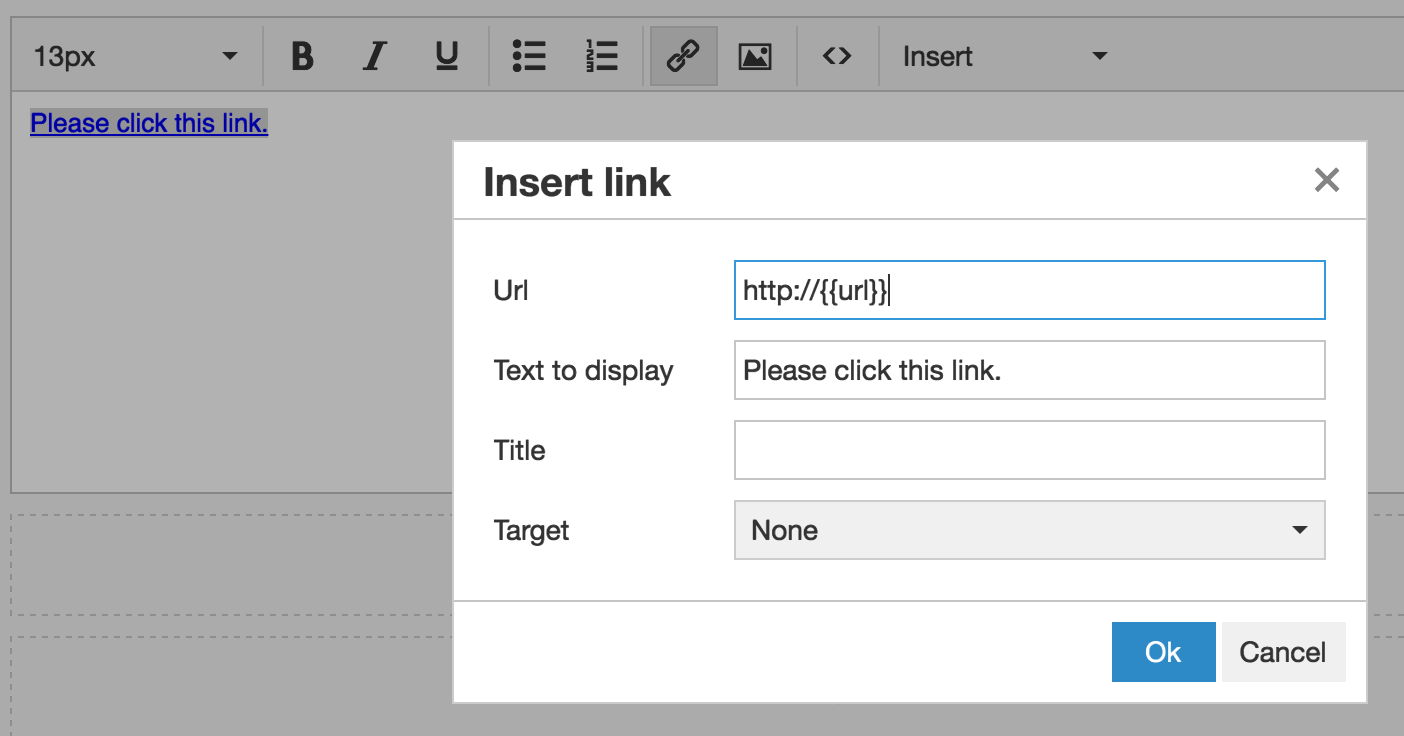
Step 3: Make sure it worked!
When you reach the “Personalize” step, you will be able to preview how the message looks to each of your recipients to make sure everything looks correct.
Personalized Image URLs
Step 1: Prepare your CSV file
Make sure your CSV file has a “imageUrl” column, or something similar. Each recipient should have their own url that goes here. To get around a little trick we’ll talk about in a second, make sure these urls don’t start with “http://” — they should have everything after it (ergo “google.com” instead of “http://google.com”).
Step 2: Composing your message
Use our email editor to insert the tag from your imported fields. Here’s a screenshot of where this tool can be found:
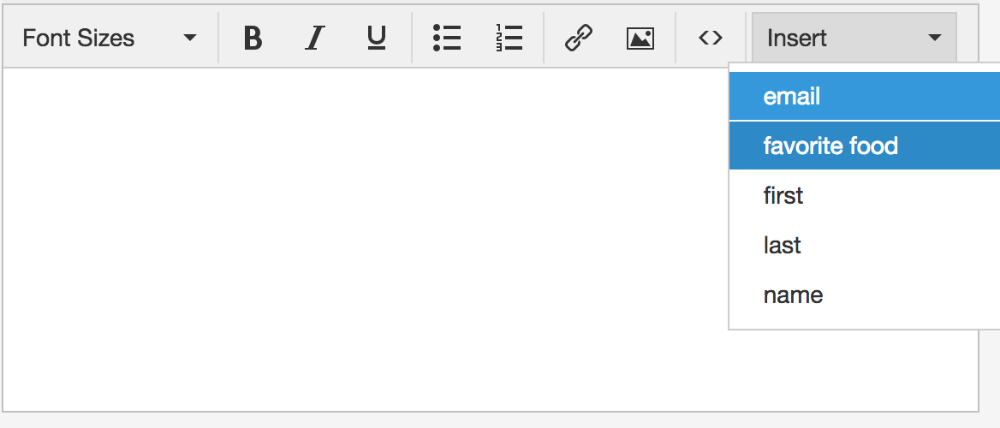
The merge tag will get inserted into your email body. Copy it to your clipboard and and click the “<>” icon to edit the HTML source of your message.
Step 3: The little trick
When you type the IMG tag to insert an image, paste the merge tag as its “src” attribute. Our email editor won’t like it unless you prefix it with “http://”. For instance:
<img src=”http://{{imageUrl}}”>
Step 4: Make sure it worked!
When you reach the “Personalize” step, you will be able to preview how the message looks to each of your recipients to make sure everything looks correct.
The Sending Calendar: Editing When/How Many Emails Are Sent
The sending calendar is where you set all of your email sending rules, across all campaigns.
How to edit your sending calendar settings
In your account dashboard, click ‘Campaigns’, then click ‘Sending Calendar’. Then click ‘Edit rules’ on the box in the top left. You should see a screen that looks like this.

You can edit your send settings from this dashboard, and your settings will apply to all campaigns for that email address. If you have multiple mail accounts connected to your account or in your team, you can set different send settings for each mail account.
Sending from an Alias
Not everyone uses Gmail or Google Apps (G-Suite) for business. But that doesn’t mean you can’t use Mailshake!
Google allows you to set up an alias, which means all your outgoing mail will appear to come from your non-Gmail address, and all replies will be dropped into your non-Gmail inbox.
In this example, the email addresses used are:
- Google account: johndoe@gmail.com
- Email address we want to send from: johndoe@mycompany.com
Here’s how to set it up:
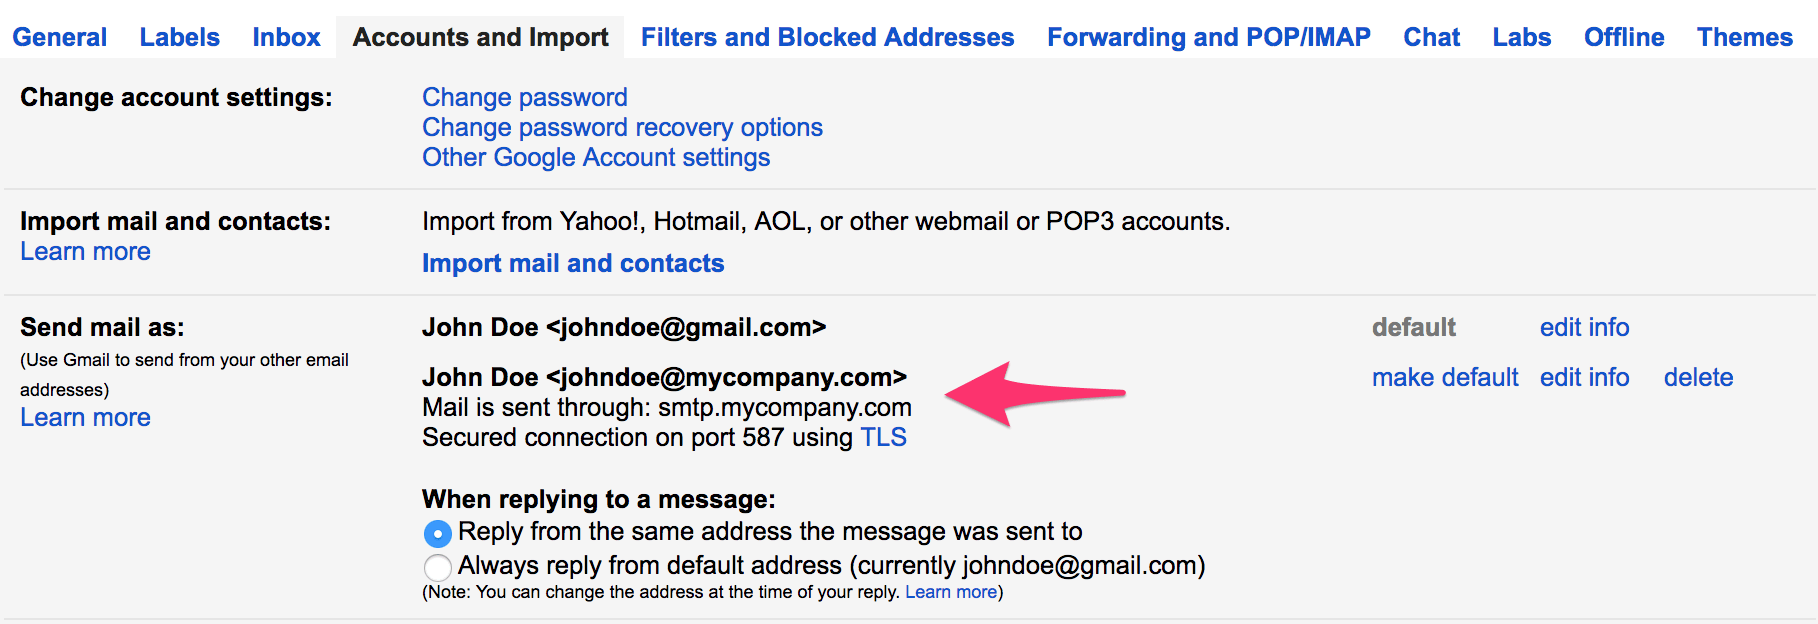
Step 1. In Gmail, set up “send mail as”
In your Gmail settings, you can add aliases to enable sending from other accounts.
In our johndoe@gmail.com account, we will add johndoe@mycompany.com as an alias.
We found this video that walks through the process (not affiliated with Mailshake).
Step 2. Forward all mail from your alias to Google
All incoming mail to your alias must be forwarded to your Google account so that we can detect replies. Without this step, we will be unable to report reply statistics and any follow-up rules based on replies will not work properly.
As an example, here’s how Google lets you forward mail:
In our johndoe@mycompany.com account, we will forward all email to johndoe@gmail.com.
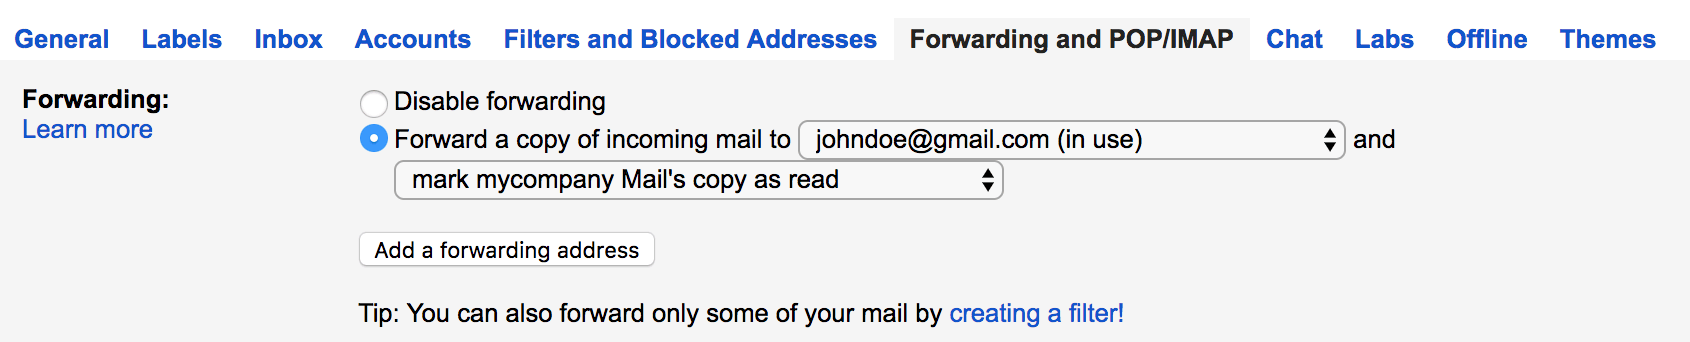
Important note for Outlook:
To work with an Outlook address, you must set up a rule to “redirect” your mail, not “forward” it. See this article for more on this.
Step 3. Test that it works
From an outside email address, send an email to your alias address (johndoe@mycompany.com). Go into your Google account (johndoe@gmail.com) and make sure that the email shows up in your inbox.
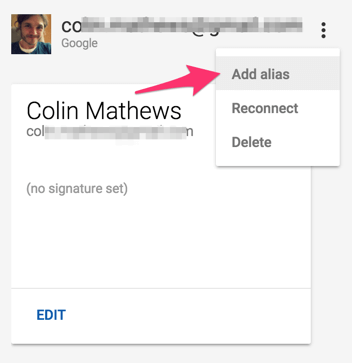
Step 4. Add the alias in Mailshake
Now you can add an alias in Mailshake by clicking “Mail accounts” in the left menu (you must be a team admin to do this).
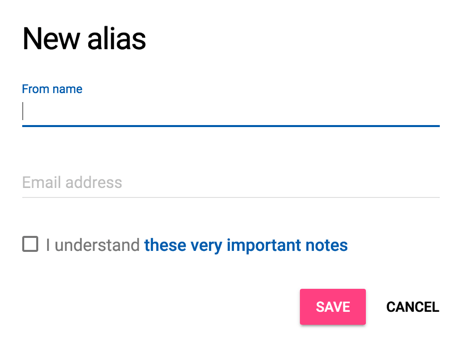
Step 5. Finishing up
In the finishing step of this action, just give us the email address of your alias ( johndoe@mycompany.com). We will attempt to send an email from this address and check your Google account (johndoe@gmail.com) to make sure it worked.
Exporting Campaign Performance Data
You can easily export open, click, and reply data from active campaigns.
To do this, hop into your campaign dashboard, click the three vertical dots next the title of your campaign, and click ‘export’. Simple as that!
Editing settings within active campaigns
There are a variety of reasons why you would need to edit an active campaign; changing an active email or adding a followup, turning link tracking on or off… The good news is, anything you set up when you created your campaign can be edited after you’ve pushed it live.
Here are a few examples:
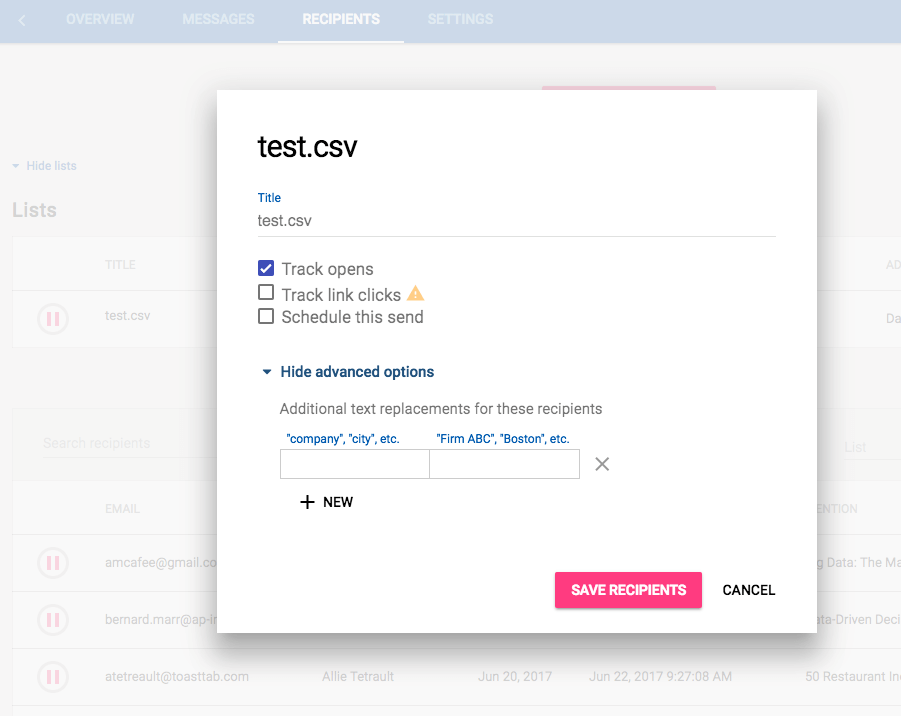
Editing settings for all emails
This is everything on the ‘options’ page when you’re setting up your campaign.
Head to your campaign dashboard and click on the ‘recipients’ tab. Then, click ‘show lists’.
Click on the list for which you want to edit the settings. A popup will appear with the settings you specified when you initially created the account. Edit open and link-click tracking, send schedules, and default text replacements.
Editing specific emails
This is even easier! In your campaign dashboard, click ‘messages’, then ‘edit messages’. From there, you can edit any active messages and add or delete messages.
—
If you have any more issues with any part of the tool, head over to our help center, and don’t hesitate to reach out to support@mailshake.com.


Continue reading


Social
![]()
![]()
![]()